

I am starting a CodeLab Series in which I will building something cool and sharing with the community.
Today, We are going to implement Authentication API in Node using JWT, express, and MongoDB.
I advise you to follow the table of content and don't miss any steps. I will provide the full app code link at the end.
Table of Content
- 1. Introduction
- 2. Prerequisites
- 3. Tools and Packages Required
- 4. Initiate Project
- 5. Setup MongoDB Database
- 6. Configure User Model
- 7. User Signup
- 8. User Login
- 9. Get LoggedIn User
- 10. Conclusion
1. Introduction
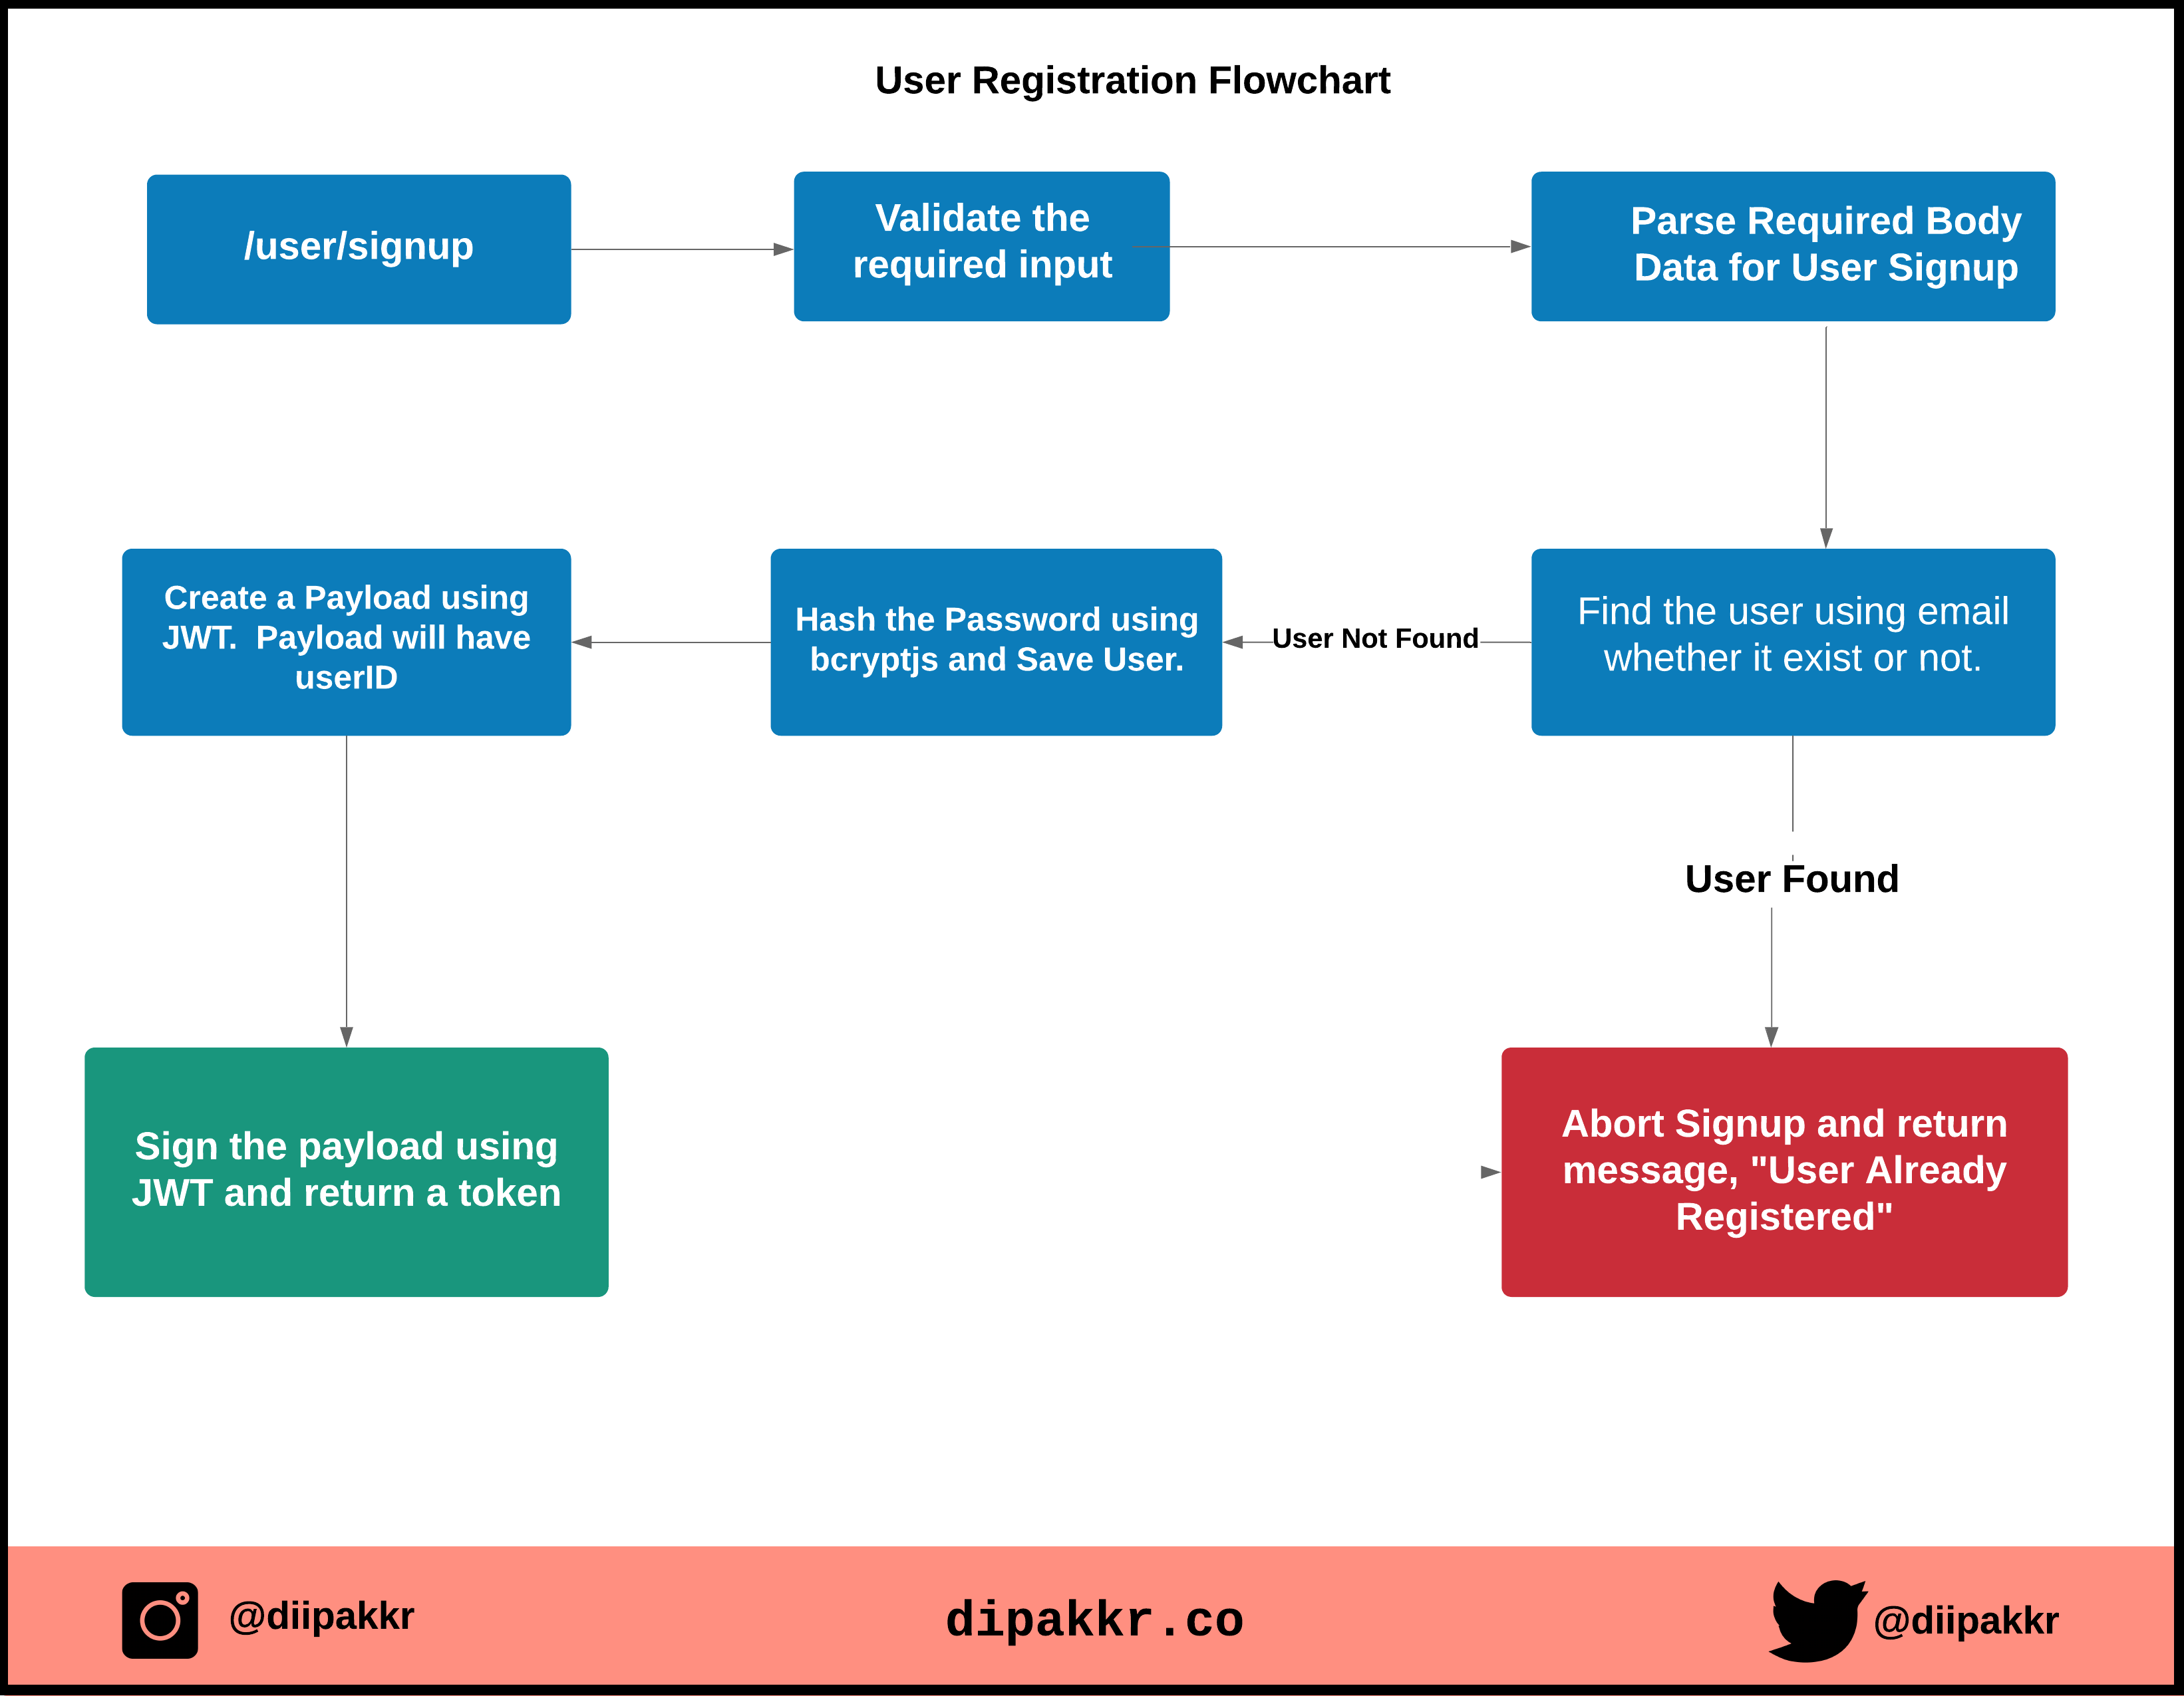
Authentication - It is a process of identifying user identity.
User Authentication contains various steps, please check out this flowchart to know more. We will be using this flow to build the authentication system in our application.
2. Prerequisites
You should have prior knowledge of javascript basics, nodejs. Knowledge of ES6 syntax is a plus. And, at last nodejs should be installed on your system.
3. Packages Required
You will be needing these following 'npm' packages.
- express Express is a minimal and flexible Node.js web application framework that provides a robust set of features for web and mobile applications
express-validator To Validate the body data on the server in the express framework, we will be using this library. It's a server-side data validation library. So, even if a malicious user bypasses the client-side verification, the server-side data validation will catch it and throw an error.
body-parser It is
nodejsmiddleware for parsing the body data.
bcryptjs This library will be used to hash the password and then store it to database.This way even app administrators can't access the account of a user.
jsonwebtoken jsonwebtoken will be used to encrypt our data payload on registration and return a token. We can use that token to authenticate ourselves to secured pages like the dashboard. There would also an option to set the validity of those token, so you can specify how much time that token will last.
mongoose Mongoose is a MongoDB object modeling tool designed to work in an asynchronous environment. Mongoose supports both promises and callbacks.
4. Initiate Project
We will start by creating a node project. So, Create a new folder with the name 'node-auth' and follow the steps below. All the project files should be inside the 'node-auth' folder.
npm init
npm init will ask you some basic information about project. Now, you have created the node project, it's time to install the required packages. So, go ahead and install the packages by running the below command.
npm install express express-validator body-parser bcryptjs jsonwebtoken mongoose --save
Now, create a file index.js and add this code.
// File : index.js

const express = require("express");
const bodyParser = require("body-parser");

const app = express();

// PORT
const PORT = process.env.PORT || 4000;

app.get("/", (req, res) => {
  res.json({ message: "API Working" });
});


app.listen(PORT, (req, res) => {
  console.log(`Server Started at PORT ${PORT}`);
});
If you type node index.js in the terminal, the server will start at PORT 4000.
You have successfully set up your NodeJS app application. It's time to set up the database to add more functionality.
###5. Setup MongoDB Database
We will be using MongoDB Database to store our users. You can use either a cloud MongoDB server or a local MongoDB server.
In this CodeLab, we will be using a Cloud MongoDB server known as mLab.
So, First, go ahead and signup on mLab. And follow the below steps.
After successful signup, Click on Create New Button on home page.
Now, choose any cloud provider for example AWS. In the Plan Type choose the free SandBox and then Click on the Continue button at the bottom right.
Select the region(any) and click continue.
Enter a DB name(any). I am using node-auth. Click continue and then submit the order on the next page. Don't worry it's free of cost.
Now, You will be re-directed to the homepage. Select your DB i.e node-auth.
Copy the standard MongoDB URI.
- Now, you need to add a user to your database. From the 5 tabs below, click on Users and add a user by clicking on Add Database User.
Now, you have got your database user. Replace the && with your DB username and password.
mongodb://<dbuser>:<dbpassword>@ds257698.mlab.com:57698/node-auth
So, the Mongo Server Address(MongoURI) should look like this. Don't try to connect on my MongoURI. It's just a dummy username & password. :smile::smile:
mongodb://test:hello1234@ds257698.mlab.com:57698/node-auth
Now, you have the mongoURI you are ready to connect your node-auth app to the database. Please follow the below steps.
6. Configure User Model
Let's go and first create a config folder. This folder will keep the database connection information.
Create a file named: db.js in config
//FILENAME : db.js

const mongoose = require("mongoose");

// Replace this with your MONGOURI.
const MONGOURI = "mongodb://testuser:testpassword@ds257698.mlab.com:57698/node-auth";

const InitiateMongoServer = async () => {
  try {
    await mongoose.connect(MONGOURI, {
      useNewUrlParser: true
    });
    console.log("Connected to DB !!");
  } catch (e) {
    console.log(e);
    throw e;
  }
};

module.exports = InitiateMongoServer;
Now, we are done the database connection. Let's create the User Model to save our registered users.
Go ahead and create a new folder named model. Inside the model folder, create a new file User.js.
We will be using mongoose to create UserSchema.
User.js
//FILENAME : User.js

const mongoose = require("mongoose");

const UserSchema = mongoose.Schema({
  username: {
    type: String,
    required: true
  },
  email: {
    type: String,
    required: true
  },
  password: {
    type: String,
    required: true
  },
  createdAt: {
    type: Date,
    default: Date.now()
  }
});

// export model user with UserSchema
module.exports = mongoose.model("user", UserSchema);
Now, we are done with Database Connection, User Schema. So, let's go ahead and update our index.js to connect our API to the database.
index.js
const express = require("express");
const bodyParser = require("body-parser");
const InitiateMongoServer = require("./config/db");

// Initiate Mongo Server
InitiateMongoServer();

const app = express();

// PORT
const PORT = process.env.PORT || 4000;

// Middleware
app.use(bodyParser.json());

app.get("/", (req, res) => {
  res.json({ message: "API Working" });
});


app.listen(PORT, (req, res) => {
  console.log(`Server Started at PORT ${PORT}`);
});
Congratulations :smile::smile: , You have successfully connected your app to the MongoDB server.
Now, the next thing we have to do is make a /user/signup route to register a new user. We will see this in the next section.
7. User Signup
The Route for user registration will be '/user/signup'.
Create a folder named routes. In the 'routes' folder, create a file named user.js
routes/user.js
// Filename : user.js

const express = require("express");
const { check, validationResult} = require("express-validator/check");
const bcrypt = require("bcryptjs");
const jwt = require("jsonwebtoken");
const router = express.Router();

const User = require("../model/User");

/**
 * @method - POST
 * @param - /signup
 * @description - User SignUp
 */

router.post(
    "/signup",
    [
        check("username", "Please Enter a Valid Username")
        .not()
        .isEmpty(),
        check("email", "Please enter a valid email").isEmail(),
        check("password", "Please enter a valid password").isLength({
            min: 6
        })
    ],
    async (req, res) => {
        const errors = validationResult(req);
        if (!errors.isEmpty()) {
            return res.status(400).json({
                errors: errors.array()
            });
        }

        const {
            username,
            email,
            password
        } = req.body;
        try {
            let user = await User.findOne({
                email
            });
            if (user) {
                return res.status(400).json({
                    msg: "User Already Exists"
                });
            }

            user = new User({
                username,
                email,
                password
            });

            const salt = await bcrypt.genSalt(10);
            user.password = await bcrypt.hash(password, salt);

            await user.save();

            const payload = {
                user: {
                    id: user.id
                }
            };

            jwt.sign(
                payload,
                "randomString", {
                    expiresIn: 10000
                },
                (err, token) => {
                    if (err) throw err;
                    res.status(200).json({
                        token
                    });
                }
            );
        } catch (err) {
            console.log(err.message);
            res.status(500).send("Error in Saving");
        }
    }
);

module.exports = router;
Now, we have created the user registration in 'routes/user.js'. So, we need to import this in index.js to make it work.
So, the updated index file code should look like this. index.js
const express = require("express");
const bodyParser = require("body-parser");
const user = require("./routes/user"); //new addition
const InitiateMongoServer = require("./config/db");

// Initiate Mongo Server
InitiateMongoServer();

const app = express();

// PORT
const PORT = process.env.PORT || 4000;

// Middleware
app.use(bodyParser.json());

app.get("/", (req, res) => {
  res.json({ message: "API Working" });
});


/**
 * Router Middleware
 * Router - /user/*
 * Method - *
 */
app.use("/user", user);

app.listen(PORT, (req, res) => {
  console.log(`Server Started at PORT ${PORT}`);
});
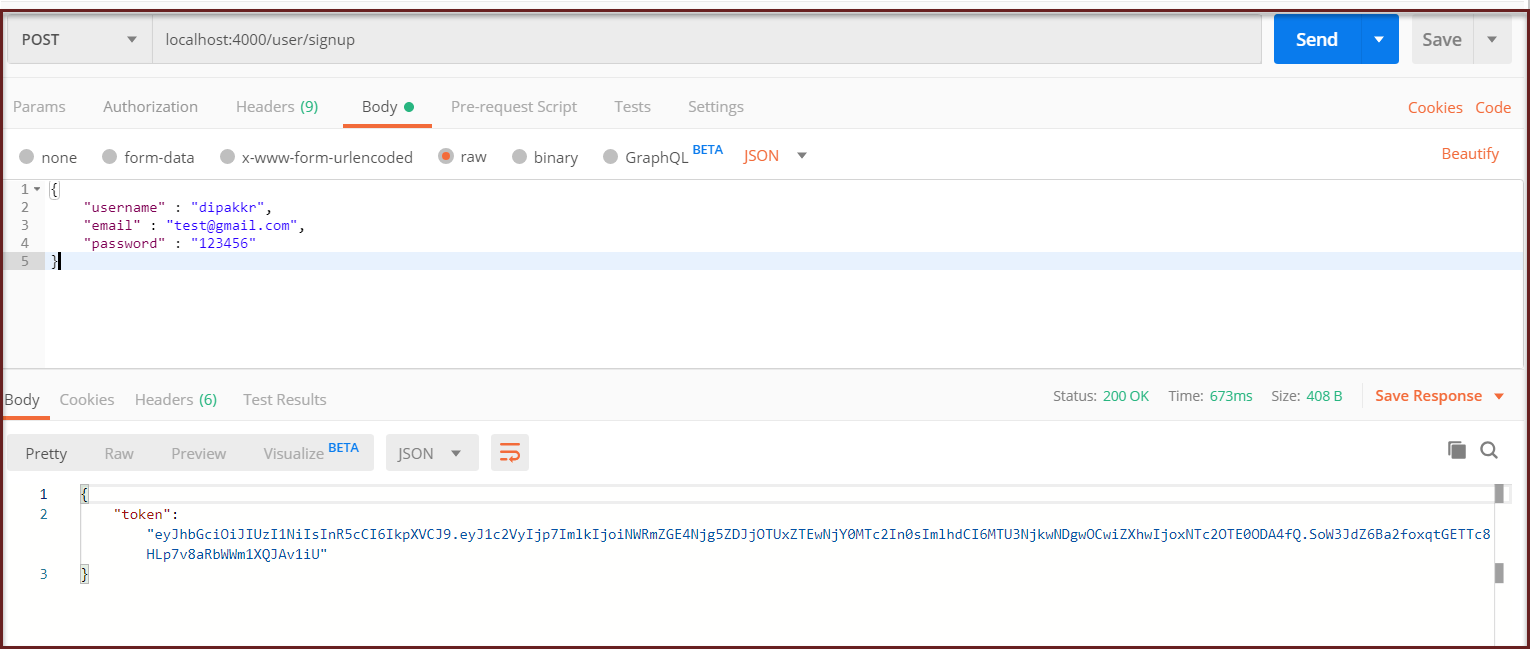
Let's start the user registration using postman. A postman is a tool for API testing.
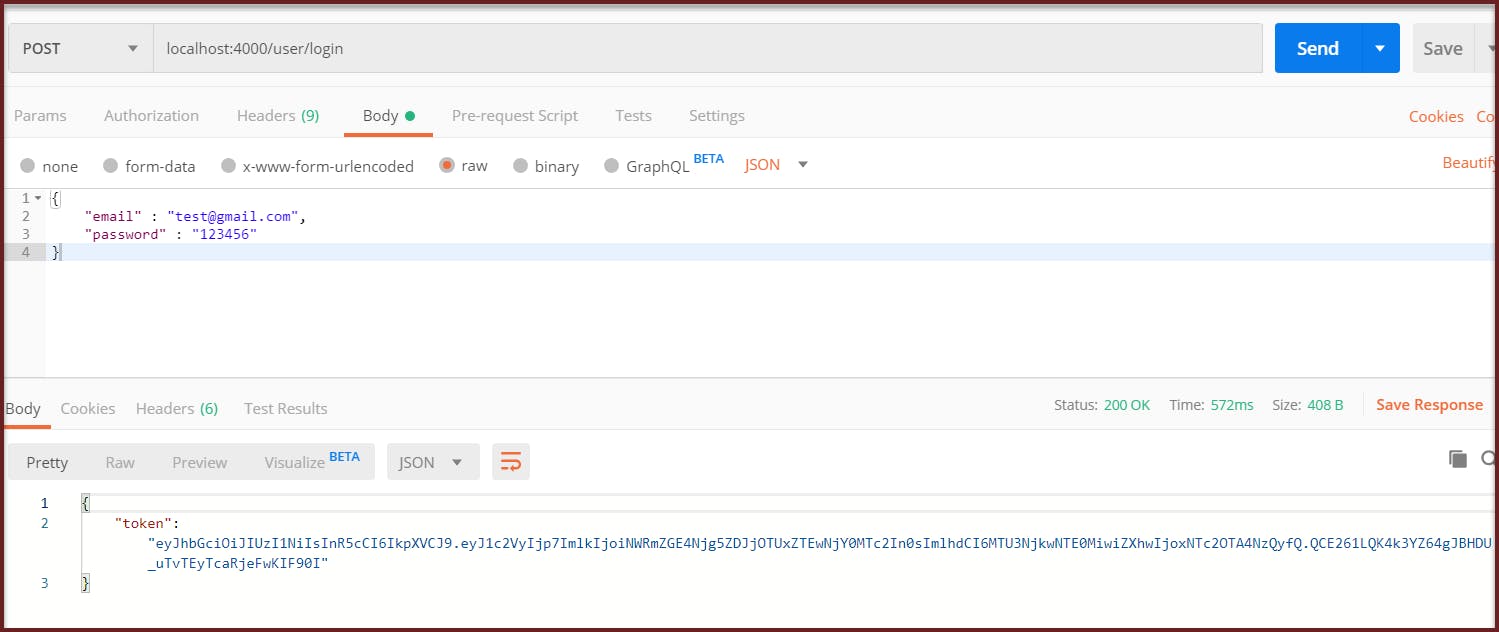
8. User Login
Now, it's time to implement the Login router which will be mounted on '/user/login'.
Here is the code snippet for login functionality. Add the below code snippet in user.js
router.post(
  "/login",
  [
    check("email", "Please enter a valid email").isEmail(),
    check("password", "Please enter a valid password").isLength({
      min: 6
    })
  ],
  async (req, res) => {
    const errors = validationResult(req);

    if (!errors.isEmpty()) {
      return res.status(400).json({
        errors: errors.array()
      });
    }

    const { email, password } = req.body;
    try {
      let user = await User.findOne({
        email
      });
      if (!user)
        return res.status(400).json({
          message: "User Not Exist"
        });

      const isMatch = await bcrypt.compare(password, user.password);
      if (!isMatch)
        return res.status(400).json({
          message: "Incorrect Password !"
        });

      const payload = {
        user: {
          id: user.id
        }
      };

      jwt.sign(
        payload,
        "randomString",
        {
          expiresIn: 3600
        },
        (err, token) => {
          if (err) throw err;
          res.status(200).json({
            token
          });
        }
      );
    } catch (e) {
      console.error(e);
      res.status(500).json({
        message: "Server Error"
      });
    }
  }
);
9. Get LoggedIn User
Now, your User Signup and User Login is working, and you are getting a token in return.
So, our next task will be to Retrieve the LoggedIn user using the token. Let's go and add this functionality.
The /user/me route will return your user if you pass the token in the header. In the file route.js, add the below code snippet.
/**
 * @method - GET
 * @description - Get LoggedIn User
 * @param - /user/me
 */


router.get("/me", auth, async (req, res) => {
  try {
    // request.user is getting fetched from Middleware after token authentication
    const user = await User.findById(req.user.id);
    res.json(user);
  } catch (e) {
    res.send({ message: "Error in Fetching user" });
  }
});
As you can see, we added the auth middleware as a parameter in the /user/me GET route, so let's define auth function.
Go ahead and create a new folder named middleware. Inside this folder, create a file named auth.js
This auth middleware will be used to verify the token, retrieve user based on the token payload.
middleware/auth.js
const jwt = require("jsonwebtoken");

module.exports = function(req, res, next) {
  const token = req.header("token");
  if (!token) return res.status(401).json({ message: "Auth Error" });

  try {
    const decoded = jwt.verify(token, "randomString");
    req.user = decoded.user;
    next();
  } catch (e) {
    console.error(e);
    res.status(500).send({ message: "Invalid Token" });
  }
};
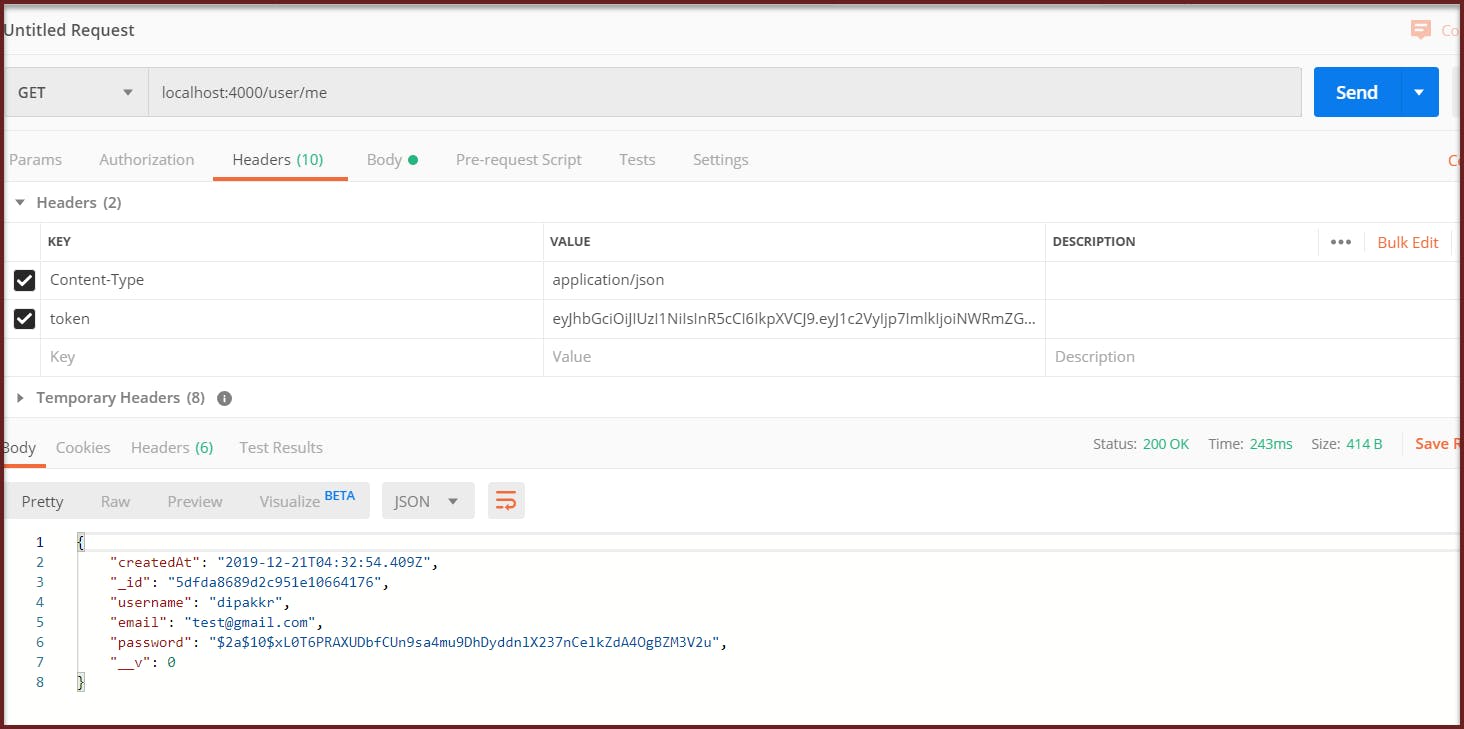
Yayy !! You have successfully created an authentication API in nodejs. Now, You can go ahead and test the /user/me endpoint after logging in.
How to Test the application?
PostMan is required for Testing the API. If you don't have PostMan installed first, install it.
First, register the user or login if you are already registered.
From step 1, you will get a token. Copy that token and put in the header.
Hit Submit
Here is a preview of testing.
10. Conclusion
In this CodeLab - 1, we covered authentication in nodejs using express, jsonwebtoken and MongoDB. We learned about how to write middleware.
Here is the link of full code for this CodeLab: github.com/dipakkr/node-auth.
Also, I would love to know what else you want to cover in the next CodeLabs.
I am glad you read till here, Please give some :heart: :heart: !!
If you face in problem in running/understanding this application, let me know in the comments. Don't forget to give your feedback. Getting feedback helps me improve.
Subscribe to my email newsletter and stay updated!
I write about new stuff almost daily. Please follow me on Twitter | Instagram